In a previous article, I argued that QuickBooks Online is a good choice for accounting firms since our needs match the QuickBooks Online feature set well. In this article, I lay out some steps for making the actual data transition go smoothly.
Accounting firms often have years if not decades of data in their QuickBooks file, and that can complicate the conversion to QuickBooks Online. By sending a reduced data set to the cloud, you can cut down on many potential issues. Also, following the steps below will give you a clean, fresh set of data – always a good feeling!
Healthy Data
The first step to moving your (or really any) file to QuickBooks Online is to make sure that your data file is healthy. Run a Complete Verify. Rebuild if necessary, and then Verify again, until you get the “QuickBooks detects no problems with your data” message. Resort your lists if you had to Rebuild.
Trim your file
Next, you are going to want to eliminate a lot of the old history in your file. If you are like my firm, you may have 20+ years of clients in your QuickBooks file, many of whom may even no longer be in business. There is no reason to move all that transactional history or even clients to QuickBooks Online when you’ll have an archival copy of QBD to use if you need to. Use the following steps to minimize the amount of data you are transferring to QuickBooks Online:
- Make a Period Copy, using the File > Utilities menu.

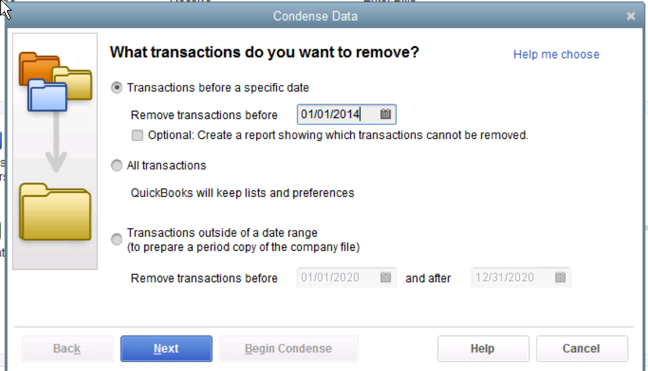
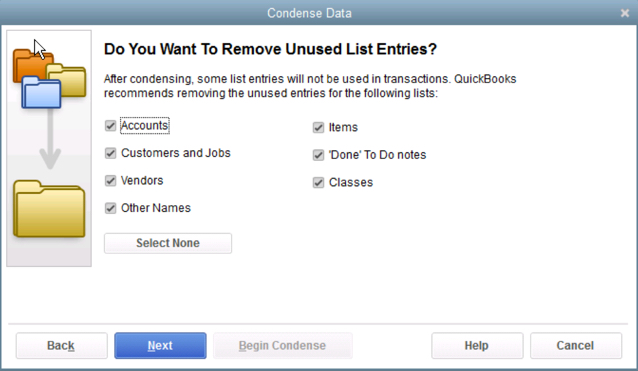
- Select a cutoff date 3 or even 2 years before, and tell QuickBooks to enter one Summary journal entry, and remove all previous transactional data. Make the election to remove any unused list items when doing this.

- Name the file [Firm Name] – QuickBooks Online Transfer (or something like that) to distinguish it from any archival or working QB files.
- Clean up the client list that remains. Do you have duplicates? Remember that QuickBooks Online never deletes anything, just marks it as inactive, so now is the time to get that list cleaned up.
- If you want to preserve information on clients that haven’t worked with your firm in years, but you think might do so in the future, use the Customer Contact List report to export relevant details to Excel (you can add columns to this report to include more data), and then upload that file to your CRM.
Ready, Set Go
Now you are ready to push the magic button – In your QuickBooks Online Transfer file, go to Company > Export to QuickBooks Online. Make sure to use the login associated with your QuickBooks Online Accountant account to use the free My Books account in QuickBooks Online Accountant and upload the data to the correct account.
Sorry – you aren’t done yet!
Make sure that you thoroughly review the data and all the company settings. You’ll also need to recreate forms, and re-do any recurring billing. If you are an Aero Workflow customer, we have a template for reviewing the uploaded data for accuracy and redoing the company settings. You can also check out this Intuit help article here.
Check for duplicate clients
However, There is one little problem with converting an accounting firm that previously has had clients using QuickBooks Online. Intuit has those existing clients listed in your QuickBooks Online Accountant Client Dashboard, but they are also listed as “customers” in your QuickBooks desktop file. When you import the file, QuickBooks will add all the Customers in your file to your QuickBooks Online Accountant client list, and vice versa. So in your list of Clients in the Accountant Dashboard and your Customer list in the My Books account can both have duplicates.
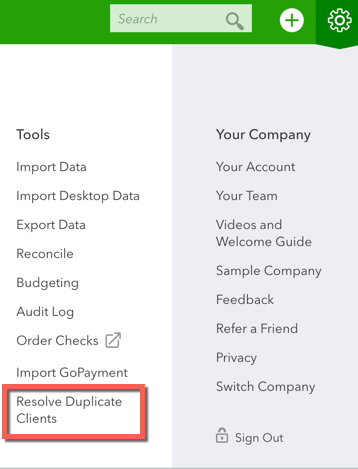
Fortunately, QuickBooks has a built-in way to deal with this issue. In the Tools section of the Gear Icon, there is a function called Resolve Duplicate Clients.

This will help get those cleaned up.
Note: if you have been using Aero Workflow prior to converting your firm to QuickBooks Online, there is a potential for triplicate(!) clients. Please contact our support department before connecting your Aero account to your QuickBooks Online account.


